Checkmk
Per my site-wide AI disclosure policy, no AI/LLM “help” was used to write this article. This article discusses the process of auditing and installing a community extension for Checkmk which was developed by a third party using Claude Code.
What is Checkmk?

Checkmk is monitoring software!
Checkmk is a software suite with a completely open-source Community flavor. As usual with these types of companies, the money is in enterprise support contracts and hosting services. Other than that, if you can manage it, you can deploy it.
Why I’m using Checkmk
This is going to sound ad copy, but I have zero association with Checkmk. I just like it when things work as advertised and don’t suck to deploy. Indeed, I may yet discover that I hate this software. If that happens I’ll come back and make it obvious.
But having taken shots with:
- Auvik
- Naigos XI
- Zabbix
- A roll-your-own Telegraf/Prometheus/Grafana Docker stack
I’m convinced that Checkmk is going to meet my needs.
In less than a day I’m set up and working with monitoring rolled out across 100% of my critical infrastructure.
Admittedly, this is small potatoes:
- 2x R730xd file servers and associated IPMIs
- 3-wide Proxmox cluster
- …and all of the VMs and LXCs therein, if I want, plus their nested Docker containers
- 1x OPNsense router
- 2x Brocade ICX campus switches
- 2x wireless APs and 1x Omada controller (in Docker, in Proxmox)
- A handful of client devices
Using multiple protocols, extensions and native agent types for:
- SNMP
- IPMI
- HTTP(S) / RESTful API
- FreeBSD
- Debian
- Windows
But right now it’s doing the thing, and with not too much configuration I’m getting emails about important stuff. I’m using it because it:
- Works,
- quickly, and
- agrees with my philosophies.
Deploying Checkmk
Let’s get into it. This is a general guide, current as of August 2026.
Please consult the developer’s documentation for the most up-to-date information.
I chose to deploy my system using Docker.
- Prepare a Docker host machine
- Create a Docker Compose file:
services:
  checkmk:
    image: "checkmk/check-mk-community:2.5.0-latest"
    container_name: checkmk
    environment:
      - CMK_PASSWORD=password
      - CMK_SITE_ID=site_name
      - MAIL_RELAY_HOST=[external_SMTP]
      - TZ=EST5ETD
    volumes:
      - ./monitoring:/omd/sites
    tmpfs:
      - /opt/omd/sites/cmk/tmp:uid=1000,gid=1000
    ports:
      - 5000:5000
      - 8000:8000
    restart: unless-stopped
There is a known issue with timezone definitions:
- Container restart fails when timezone contains an underscore, due to conflicting
sedexpression - Workaround: use POSIX timezone definition instead of tzdatabase/Olson format (e.g.
America/New_York) - Merge and release are pending
- Notes:
- You may name the container whatever you want, it does not have to be
checkmk. It is not necessary to definecontainer_name. - I elected to use a bind mount for my storage volume
- Complex networking was not needed for my use case
- You may name the container whatever you want, it does not have to be
- Execute
docker compose up -dandwatch docker logs [container_name]to monitor bootstrap - Log in to the web portal at port 5000 using
cmkadminand[password]
Adding plugins & monitoring OPNsense
I wanted to monitor an OPNsense deployment. OPNsense is a BSD appliance, and Checkmk provides a BSD agent package.
Though OPNsense allows the administrator to add their own packages, it is an opinionated system: I prefer not to touch the system packages, and use only official/community plug-ins.
A community Checkmk agent plug-in is not available for OPNsense. Good news: a community plug-in for Checkmk itself is available which extends Checkmk with OPNsense integration via RESTful API. Bad news: it’s Claude Code. Good news: it’s simple Python scripts and can be easily audited.
First let’s check out the repo and make sure we aren’t downloading anything with, uh, bad vibes…
def _uptime_seconds(uptime_str):
    # e.g. "3 days, 04:52:30"
    if not uptime_str:
        return None
    days = 0
    m = re.search(r"(\d+)\s+day", uptime_str)
    if m:
        days = int(m.group(1))
    hms = re.search(r"(\d{1,2}):(\d{2}):(\d{2})", uptime_str)
    secs = days * 86400
    if hms:
        secs += int(hms.group(1)) * 3600 + int(hms.group(2)) * 60 + int(hms.group(3))
    return secs
All of the functions are like this clearly good-natured uptime check.
The documentation defines the required permissions:
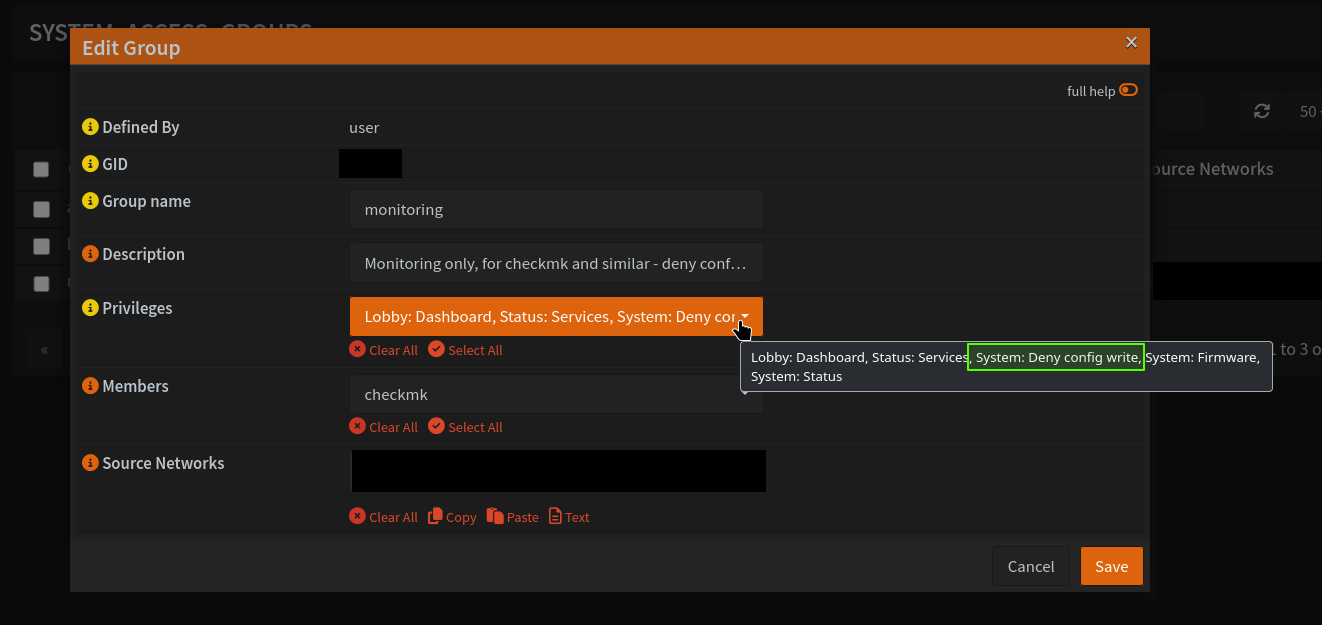
- Lobby: Dashboard
- Status: Services
- System: Firmware
- System: Status
The documentation also recommends granting the monitoring user System: Deny config write “privilege”, which is OPNsense’s slightly unintuitive manner of creating a read-only user account. With the code audited and the use of a read-only user, I feel comfortable wiring this up.
Plugin installation process on Docker
- Locate the plugin you wish to install, for example https://exchange.checkmk.com/packages/opnsense/2750/opnsense-1.0.3.mkp
- Open a shell on your Docker host
- Execute the following commands:
$ wget [url]$ docker cp opnsense-1.0.3.mkp [container_name]:/tmp/$ docker exec -it -u [site_name] [container_name] bash -l- This command opens a shell inside the container as a user
- Specify the user as the site name you chose earlier, not as
cmkadmin, and specify the container name - This should drop you into a shell with a prompt like
OMD[site_name]:/$ - This is the Checkmk server management shell
- From here you have management binaries in your $PATH, including
mkpwhich is needed to install packages
- Test this with
OMD[site_name]:/$ mkpwhich should return program help information OMD[site_name]:/$ mkp add /tmp/opnsense-1.0.3.mkpOMD[site_name]:/$ mkp enable opnsense- You do not have to invoke the full package major/minor name unless you have multiple versions of a package
OMD[site_name]:/$ mkp listshould yield something like the following:
Name     Version Title                        Author     Req. Version Until Version Files State
-------- ------- ---------------------------- ---------- ------------ ------------- ----- -----------------------------
opnsense 1.0.3   OPNsense firewall (REST API) Alex Wilms 2.3.0b1      None          14    Enabled (active on this site)
This integration will function immediately with no container restart required.
Prepare a user account on OPNsense
In OPNsense’s web UI:
- Navigate to
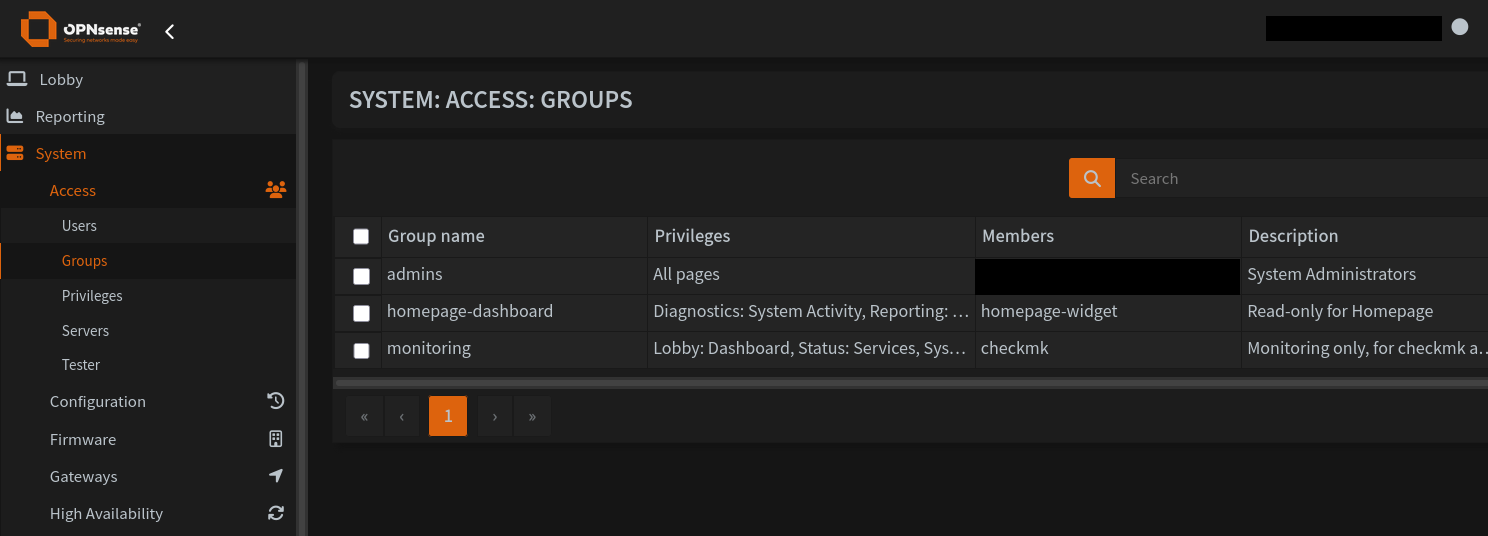
System > Access > Groups - Create a new group (I named mine
monitoring) - Grant it the privileges described above, including System: Deny config write
- Lock down the source network if desired
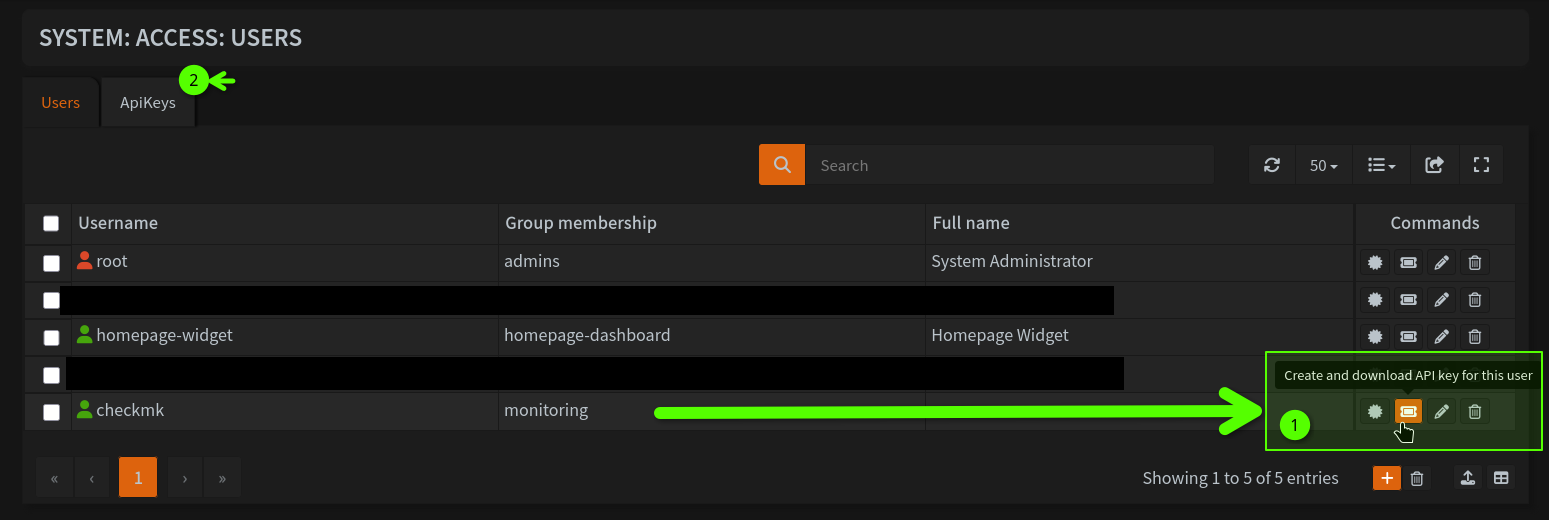
- Navigate to
System > Access > Users - Create a new user (I named mine
checkmk) and grant appropriate group membership - In the
Userslist, underCommands, click the ticket icon - “Create and download API key for this user”
Prepare a secret in Checkmk
In Checkmk’s web UI:
- Navigate to
Setup > General > Passwords - Click the blue “plus” icon to add a password
- Give it a name (ex.
opnsense_[site_name]_API_secret) - Enter the secret (the API private key) in the
Passwordfield
Configure the host in Checkmk
In Checkmk’s web UI:
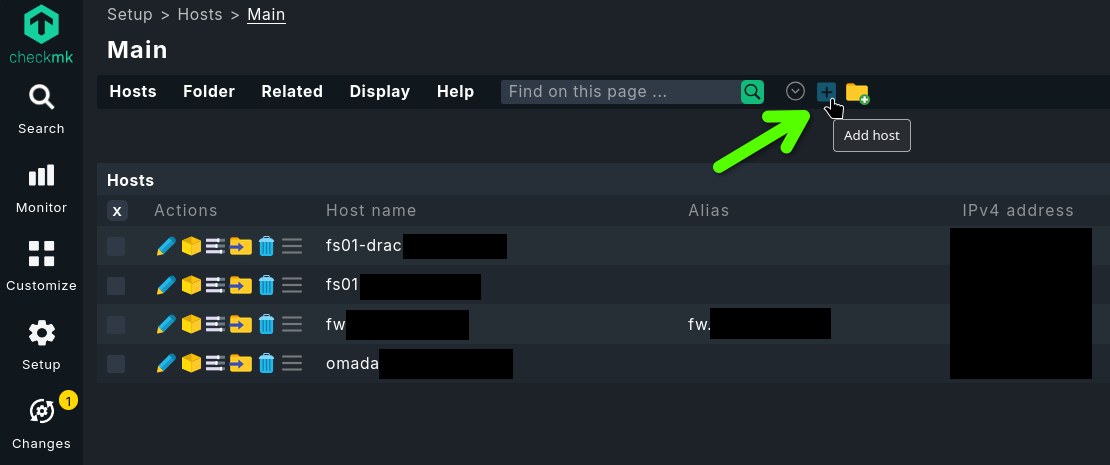
- Navigate to
Setup > Hosts - Click the blue “plus” icon to add a host
- Give the host a DNS name (and alias if applicable)
- Define network address(es) (click “show more…” to add additional IP addresses)
- Under
Monitoring agents, tick “Checkmk agent / API integrations”- From the dropdown, select “Configured API integrations, no Checkmk agent”
Configure the agent rule in Checkmk
In Checkmk’s web UI:
- Navigate to
Setup > Agents > Other integrations - Navigate to
Networking > OPNsense firewall (REST API) - Click the blue “plus” icon to add a rule
- Note: each firewall host requires a unique rule.
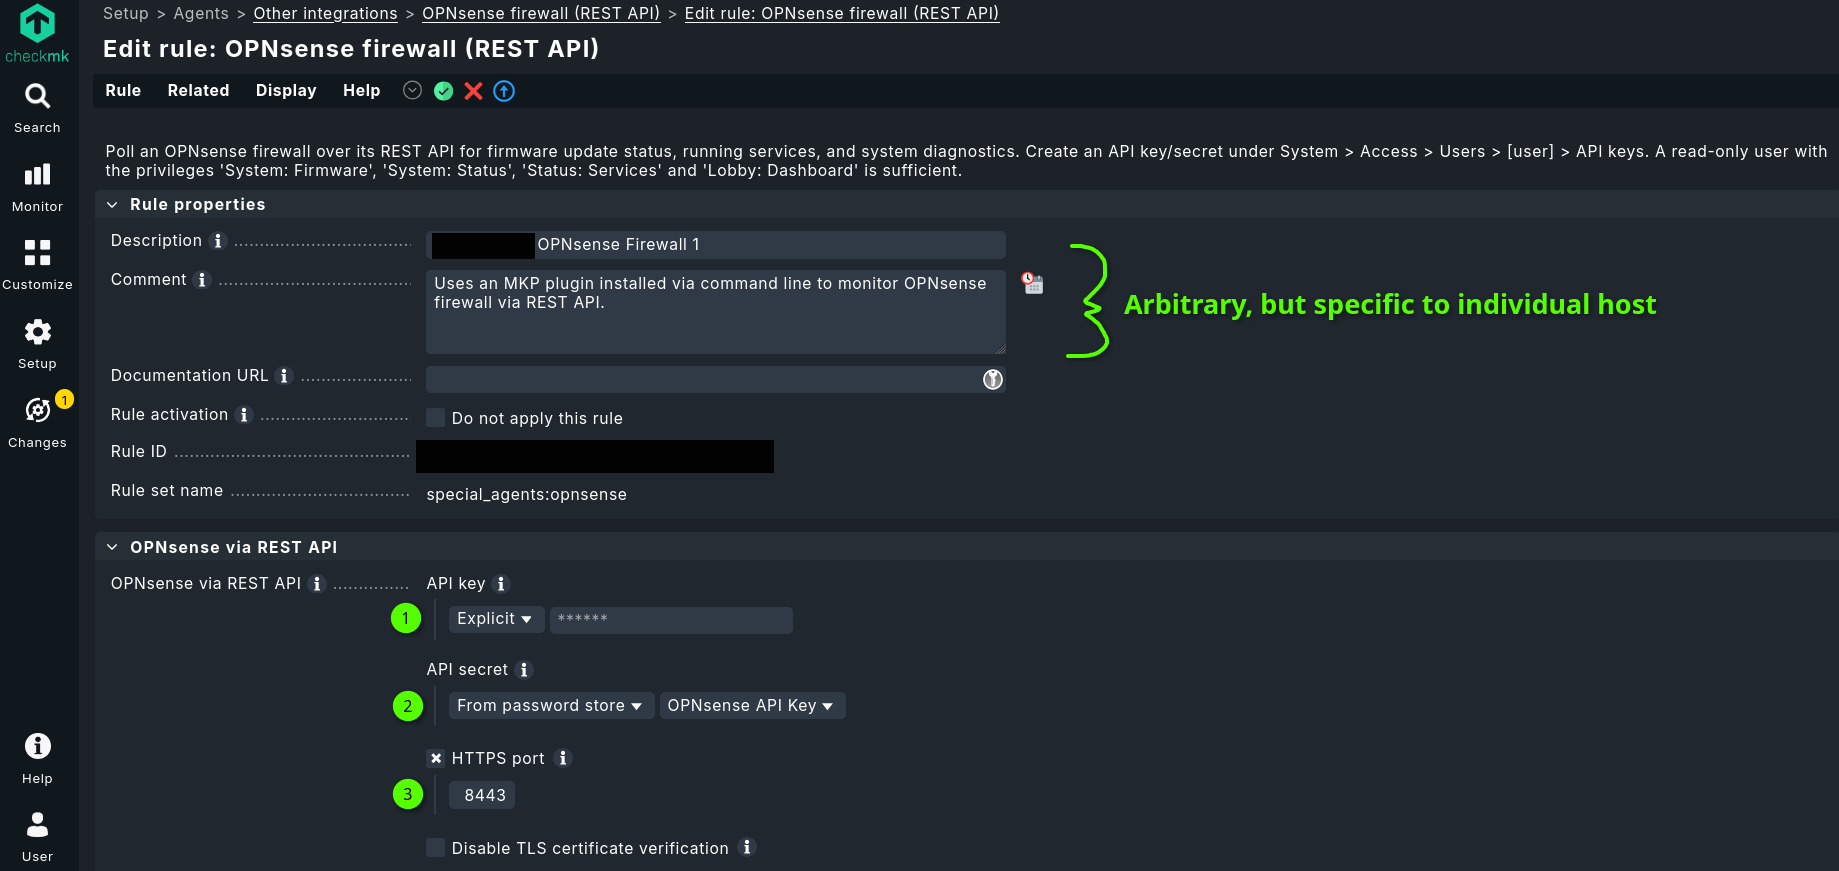
- Give the rule a description/comment unique to the firewall
- Under “API key” and “API secret”, enter the public key (“Explicit”) and secret key (“From password store”)
- Note: you could store both halves of the keypair in the password store - or neither. Arbitrary choice.
- Ensure “HTTPS port” is the same as used in your OPNsense deployment’s web UI settings
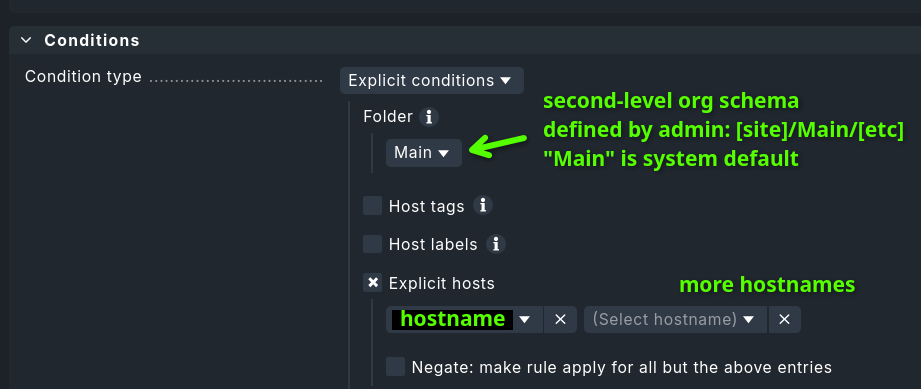
- Under “Conditions”, set an “Explicit condition” to apply to the specific host you’re configuring
Run service discovery on the OPNsense host
In Checkmk’s web UI:
- Navigate to
Monitor > All hostsand click your OPNsense host - Click
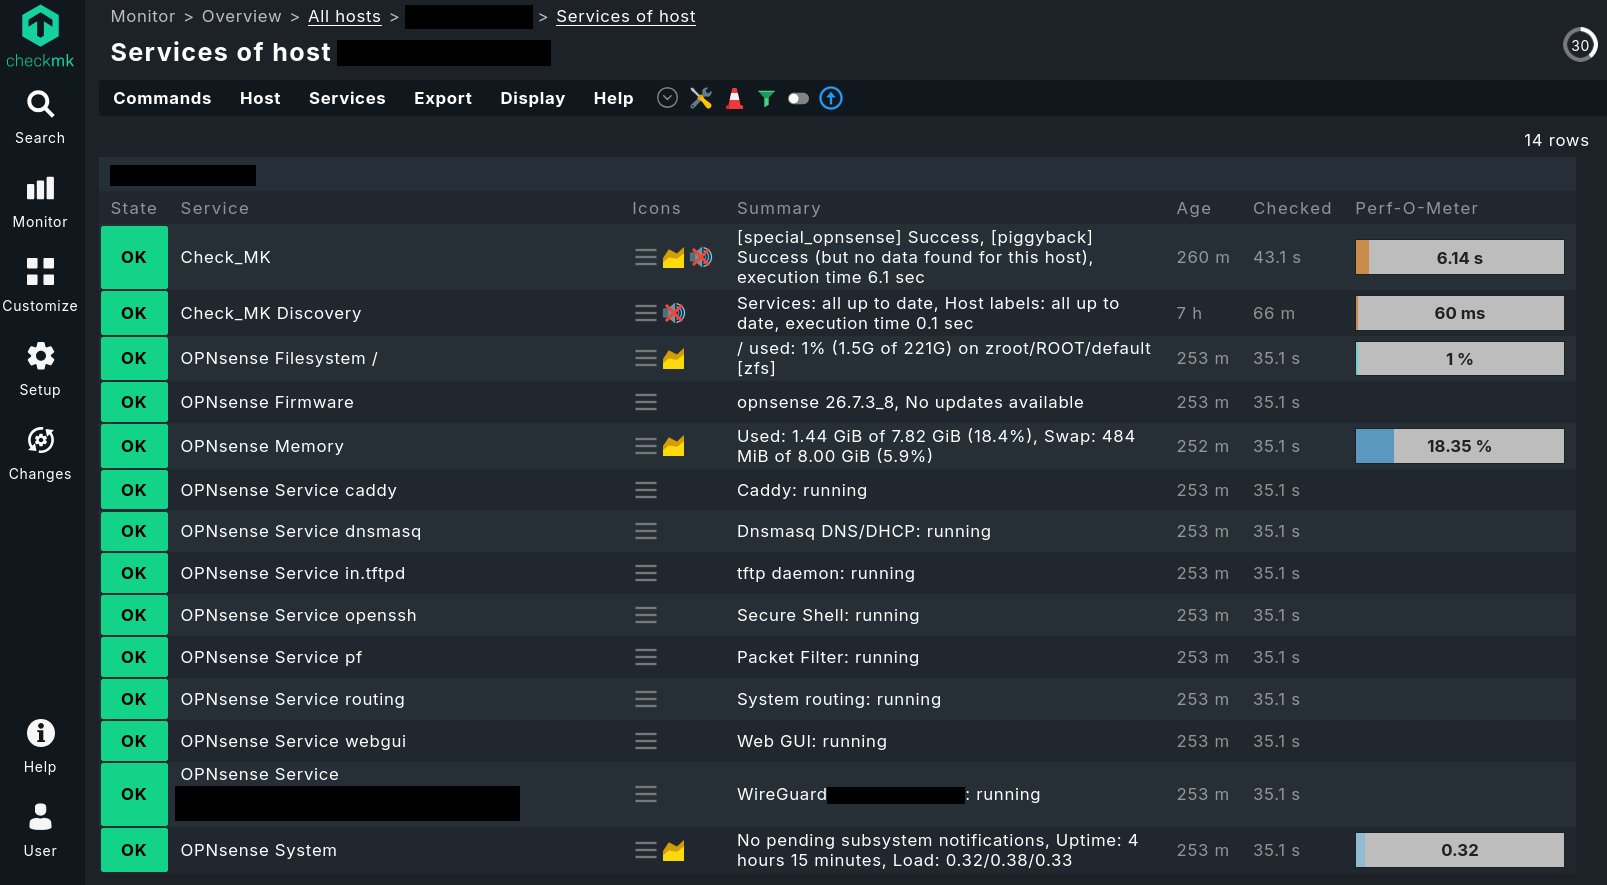
Host > Run service discovery - You should see a connection successfully establish
Checkmk is monitoring...software!